Friday, December 28, 2012
NiGHTS Into Dreams
Fixed: Hud
Issues: Some elements at wrong depth (explosions)
Optional:
Press F2 to change HUD depth
Press F3 to change HUD depth
Press F4 to turn HUD off (Good for screen shots)
This game is pretty amazing in 3D. I just started playing, I am not really sure if I will finish yet but I didn't really like HUD being a mile in front of the character.
Shaderoverride
Monday, December 24, 2012
FarCry3 (DX9 only) - 3D Vision fix
FarCry3 (DX9 only) - 3D Vision fix.
Updated (same link).
Tested on 1.5 patch.
added 3D RPG crosshair.
fixed water from 1.4 patch.
Fixed distant shadows flickering, should not require changing the game profile via NVInspector (at least it works for me. I use single 680, may still not work with sli).
Old version can be downloaded here.
Fixed:
- Light;
- Shadows;
- water effects;
- some on screen effects;
- HUD, Target markers and cross hairs in 3D;
- Ambient occlusion.
Screenshots gallery.
Remaining issues:
- Some markers have wrong depth on UI (messages) because they share same texture as target markets (very minor issue).
- some lights effects cut off on far distance (night, indoor only. example), also minor issue. I leave it at this stage until I will managed how to fix it(maybe never).
- if you have wrong shadows or other minor problem try to restart the game. Sometime 3DVis won't work correctly with this game(i.e. create 3D surface as 2D and etc) and restart may help.
Instructions:
Works only with DX9 render !
Download this archive. Unpack downloaded archive in to the "BIN" game folder (example : ":\Steam\steamapps\common\Far Cry 3\bin").
If you want to use the fix with any third-party game overlays or other DX9 hook software download this version and unpack(overwrite everything if you used previous version of the fix) it in to the "BIN" folder where "farcry3.exe" located (Important: remove d3d9.dll from the game folder if you installed previous version of the fix or fix from above). Launch "HeliXmodLauncher.exe" and run the game after.
SLI Users Instructions -IMPORTANT- not required anymore.
Minimizing- maximizing (Alt + Tab) game window can cause some weird effects like this (or other weird lights effects).
Can be fixed by minimizing game once more (Alt + Tab).
This is not related with fix.
Y - key switches(cycle) HUD depth (3 variants).
U - key switches (cycle) depth presets (2 variants).
Holding Mouse 2 key activate low separation preset (for good aiming from the gun)
If you want to save your custom convergence settings press "U" and select required preset, set custom separation/depth settings , then press F7 and your settings will be saved in the config file. You can set custom settings for both presets and for gun preset as well (when holding mouse button 2(aiming gun), set custom separation/depth settings and press F7. Release mouse button 2).
Tested only with steam version (1.5) of the game. I'm using default game profile from latest beta Driver (more stable for me).
Updated (same link).
Tested on 1.5 patch.
added 3D RPG crosshair.
fixed water from 1.4 patch.
Fixed distant shadows flickering, should not require changing the game profile via NVInspector (at least it works for me. I use single 680, may still not work with sli).
Old version can be downloaded here.
Fixed:
- Light;
- Shadows;
- water effects;
- some on screen effects;
- HUD, Target markers and cross hairs in 3D;
- Ambient occlusion.
Screenshots gallery.
Remaining issues:
- Some markers have wrong depth on UI (messages) because they share same texture as target markets (very minor issue).
- some lights effects cut off on far distance (night, indoor only. example), also minor issue. I leave it at this stage until I will managed how to fix it(maybe never).
- if you have wrong shadows or other minor problem try to restart the game. Sometime 3DVis won't work correctly with this game(i.e. create 3D surface as 2D and etc) and restart may help.
Instructions:
Works only with DX9 render !
Download this archive. Unpack downloaded archive in to the "BIN" game folder (example : ":\Steam\steamapps\common\Far Cry 3\bin").
If you want to use the fix with any third-party game overlays or other DX9 hook software download this version and unpack(overwrite everything if you used previous version of the fix) it in to the "BIN" folder where "farcry3.exe" located (Important: remove d3d9.dll from the game folder if you installed previous version of the fix or fix from above). Launch "HeliXmodLauncher.exe" and run the game after.
Minimizing- maximizing (Alt + Tab) game window can cause some weird effects like this (or other weird lights effects).
Can be fixed by minimizing game once more (Alt + Tab).
This is not related with fix.
Y - key switches(cycle) HUD depth (3 variants).
U - key switches (cycle) depth presets (2 variants).
Holding Mouse 2 key activate low separation preset (for good aiming from the gun)
If you want to save your custom convergence settings press "U" and select required preset, set custom separation/depth settings , then press F7 and your settings will be saved in the config file. You can set custom settings for both presets and for gun preset as well (when holding mouse button 2(aiming gun), set custom separation/depth settings and press F7. Release mouse button 2).
Tested only with steam version (1.5) of the game. I'm using default game profile from latest beta Driver (more stable for me).
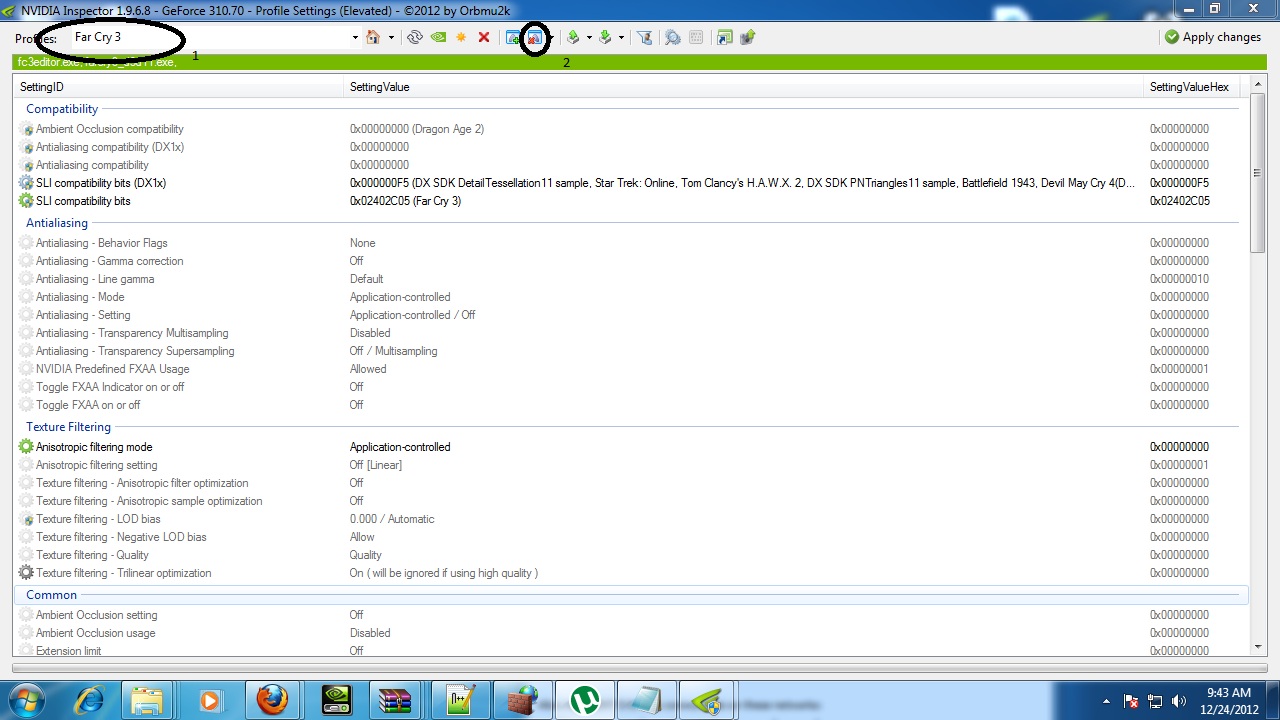
FARCRY 3 SHADOWS/LIGHTING FIX FOR SLI USERS
FARCRY 3 SHADOWS/LIGHTING FIX FOR SLI USERS
THIS IS NO LONGER NECESSARY FOR FARCRY 3. I AM KEEPING THIS PAGE UP FOR INSTRUCTIONS ON HOW TO CHANGE GAME PROFILES.
![EXTRACT THEN LAUNCH[DO NOT LAUNCH FROM ARCHIVE]. CLICK WRENCH/SCREWDRIVER ICON](http://www.ozone3d.net/public/jegx/201103/nvidia_inspector_1.9.5.5.jpg)
5.IN CATEGORY SLI COMPATIBILY BITS REMOVE EXISTING LINE THEN PASTE THE FOLLOWING
0x02402C05 (Far Cry 3)
CLICK APPLY CHANGES
Special Thanks: Arioch, People who helped figure out issue
0x02402C05 (Far Cry 3)
CLICK APPLY CHANGES
Special Thanks: Arioch, People who helped figure out issue
Friday, December 14, 2012
Burnout Paradise
Fix by Eincrou
Updated December 29, 2012
Updated December 29, 2012
Created using Steam version. Game version 1.0.0.1.
Description
Burnout Paradise is rated "Good" on NVIDIA's stereoscopic compatibility list, but I would personally rate it "Excellent." The game renders very well without fixes, and like any racing game, benefits a lot from being viewed in S3D.
Actually, it probably benefits even more since it's a destruction game and you can send light posts, mailboxes, railings and assorted other bits of debris flying out of your screen. Unfortunately you can't see what it's like to have a pedestrian flying out at you, I'm sad to say. The city's sidewalks are completely barren in this game. Oh, well.
What's one thing that's always great to have when you're playing a game in S3D? If you're like me and play with a deep world, it's always handy to have the HUD rendering with depth. It reduces the amount of muscle movement needed for the eyes to focus on the HUD and then refocus back to the game world.
A 2D UI isn't intolerable, but it certainly isn't optimal. This fix makes the entire user interface render in 3D and removes some bad effects.
This fix solves:
- All menus, the HUD, texts and the minimap render with depth.
- 2D smoke from skidding/crashing disabled.
- Headlamps causing halos/ghosting/doubling disabled.
Problems not fixed:
- All issues addressed.
- I wish I could fix the smoke and headlamp effects, rather than disable them, but I don't know how.
Change log:
- v2: (12/29/2012) 2D smoke effects and headlamps disabled.
- v1: (12/14/2012) Initial fix for UI depth.
How to Get It Working
Extract the zip file to the same location as BurnoutParadise.exe. For me this is:
[...]\Steam\steamapps\common\Burnout(TM) Paradise The Ultimate Box\
Download
- HelixMod-BurnoutParadise_v2.zip (Includes release dll)
Thursday, December 13, 2012
Darksiders (2010)
Fix by Eincrou
Updated December 18, 2012
Updated December 18, 2012
Created using Steam version. Game version 1.1.
Description:
Darksiders is rated "Excllent" in NVIDIA's compatibility list, and despite my skepticism of their "Excellent" ratings after the stereoscopic disaster that is Dark Messiah of Might and Magic, I actually agree with them for once.
The game looks incredible in S3D and has few problems with anomalies. The anomalies are either intermittent or not too bothersome. Look at the "Problems not fixed" section for my report on the anomalies.
The biggest problem is the 100% 2D UI, especially the targeting reticles for War's various ranged weapons. I've had nothing but failure for the past five or six games I've tried to fix, but I was finally able to make something happen with Darksiders. I tried to address the 2D UI, though my success remains incomplete.
This fix:
- Menus render with depth. I gave the text slightly less depth than the menu art. Why? Because it looks awesome. That's why.
- Depth for texts, including subtitles, can be turned off with the comma key ( , ) and turned back on with period key ( . ). These keys can be changed in DX9Settings.ini. Use this webpage for the key code numbers (middle column).
- HUD, including crosshairs, have depth.
- Mini-map has depth.
Problems not fixed:
- The HUD renders strangely, but I got around this by finding the texture elements of each crosshair. They are given as much depth as possible before the edges start clipping. One element, a pulsing circle, was left alone because that texture is reused many times.
- Skyboxes render too shallow. No acceptable solution has been found yet.
- Various effects do not render identically in both eyes - for example, the swirls around the rim of portals, the swirl around Void Walker on War's arm, fire on flaming skeletons, the chain around War's hand when Abyssal Chain is equipped, and several more.
- Portals have a rim effect, which renders in only the left eye.
- Portals show you what is on the other side when you look into them, but the world beyond the portal renders at the wrong depth.
Change Log:
- v4: (12/16/2012)
- Fixed crosshair for Angel-blaster-gun-thing. There's one other ranged weapon in the game, a demon-explosive-spike-throwing-thing, but it appears in only one brief part of the game. I have no save game to get back there, so it remains unfixed.
- v3: (12/15/2012)
- Increased depth of crosshairs for five ranged weapons. Depth fix for crosshair of final ranged weapon coming soon. There isn't as much depth as I would like, but the textures start clipping if I go any higher. If you have any suggestions for correcting this, let me know.
- Increased depth of enemy target indicators
- Changed default secondary depth setting for text (pressing the , key) from 2D to a slight bit of pop-out.
- v2: (12/14/2012)
- Add ability to set text to 2D. Useful for prerendered 2D cutscenes.
- v1: (12/10/2012)
- Initial Fix
How to get it working:
- Extract the fix into the same location as DarksidersPC.exe. For me, this is: [...]\Steam\steamapps\common\Darksiders
- Four of the fixed vertex shaders are personal to each system. You will have to download the debug version of d3d9.dll to dump them.
- Rename the release version of d3d9.dll that you extracted from the fix zip to something temporary. I like to use d3d9r.dll.
- Extract the debug version to the same directory as DarksidersPC.exe.
- Boot the game, and you should see red text at the top of your screen. If not, ensure that the d3d9.dll in your Darksiders folder is the debug version.
- Load into the game, and enter the equipment menu.
- Now, use the debugger's hotkeys to search for the shaders we need. Use NUM5 to advance and NUM4 to decrease. I recommend going to about VS#100 and if you don't find the element, go backwards and you should hopefully find it in the 400s.
- Look for the following elements to turn off: [1] texts, [2] menu art, [3] sword XP progress bar, and [4] green part of the health bar.
- Each time you select a VS that turns off one of these elements, write a note with what that element is, and the eight-digit CRC. The CRC is the characters after the "0x" part.
- When you find all four, exit the game and go into the ShaderOverride/VertexShaders directory and find the following text files: [1] 826E8EA7, [2] F516508B, [3] DA3DFC7A, [4] E3832F4F.
- Rename each of these filenames to the corresponding CRC you wrote down. If you need to be extra sure of what the fixed CRCs do, you can open up the text files see my comments.
- Now, when you relaunch the game you should find that these four interface elements render with depth. If not, double check that you have properly located each of your personal CRCs and matched them to the fixed CRCs.
- When all is working, delete or rename the debugging d3d9.dll, and rename the release version to d3d9.dll.
IMPORTANT! I need feedback on the following:
- I created this fix while running my graphics card in dual-GPU mode. I tried running the fix while in single-GPU mode, and the fix caused the game's graphics to become corrupted when 3D was enabled. I need to know if this affects people running with one GPU. I'd also like to know if it doesn't affect SLI users. In short, TESTERS NEEDED!
Download:
HelixMod-Darksiders_v4.zip (Release and debugging DLLs included)Thursday, December 6, 2012
MIASMATA
Miasmata
by 3D4DD
by 3D4DD
BEFORE | AFTER |
Fixed: skybox, water (by profile), HUD and godray presets
Attention: The correct depth of the sky and HUD elements depends on the correct convergence setting that is automatically choosen when You start the game. I don't recommend to change this value.
Installation: Extract the content of the zip file into the folder where Miasmata.exe is installed.
To fix issues with transparent water either rename Miasmata.exe to aion.exe or add Miasmata.exe to the Aion-Profile using NVIDIA Inspector. Choose the lowest quality for water in the games's graphic settings.
Usage:
There are hotkeys that change the depth of the HUD and the appearance of godrays. As the godrays are 2D they may cause irritation in some situations. So I've included the option to make the godrays look more diffuse so that it looks like a layer of haze (see image comparison)!. It seems better to me than removing the godrays completely.
Hotkeys:
0 default settings: HUD at arm`s length and original godrays
9 diffuse godrays
8 HUD at max depth (for triangulation)
7 HUD at arm's length
Thanks a lot to eqzitara and DHR for making the essential shader fix!
SHADEROVERRIDE
Tuesday, December 4, 2012
GUIDE: How to bind a custom convergence/depth settings[Cycle] to a key of choosing.
GUIDE: How to bind a custom convergence/depth settings[Cycle] to a key of choosing.
Step 1: Download file. HERE
Step 2: Find game's .exe. Extract into same folder / One level up/ AND In any folder labeled BIN.
Step 3: Start game and Test U key and make sure key cycles.
If this does not work either game is not DX9, Installed incorrectly, or is incompatible.
Step 4: Find your preset 1 situation. Now click U and adjust your depth/convergence and save with F7, repeat up to three times.
ADVANCED USERS ONLY[YOU ARE ON YOUR OWN]
Optional
[1]
If you want to use only 2 keys. Open your dx9settings.ini
CHANGE
Presets = 12;13;14;
TO
Presets = 12;13;
[2]
If you want a different KEY to activate open dx9settings.ini
Change the 85 in...
Key = 85
To a different Key. Use this ASCII CHART HERE. Look at at Capital letters in DEC section. Please keep in mind not all keys are compatible. If you want the letter O it would look like...
Key = 79
-----
THIS IS FOR CODERS
BY MANA84
It has a small flaw where it may leave a . after the output like Texcoord1 o2[.] just make sure to check if it does that then remove it. Should save some time if doing an old game. Make sure to remove preshader lines if it has any before hand as well. Just drag and drop.
FILE HERE
BY MANA84
It has a small flaw where it may leave a . after the output like Texcoord1 o2[.] just make sure to check if it does that then remove it. Should save some time if doing an old game. Make sure to remove preshader lines if it has any before hand as well. Just drag and drop.
FILE HERE